New YouTube Channel!!

Hey everyone! Sorry I haven’t posted anything in so long… I’ve been making some changes and I’m very happy to announce I’ve just started a new YouTube channel! Please check it out and subscribe if you like what you see 🙂

Here’s my first ever YouTube video, I hope you enjoy it!

Mermaid Crown

SAM_8428

Hey everyone! I’ve been busy experimenting with things to potentially sell in my (hopefully near) future online store, but here’s a little something I’ve been really excited to blog about since I made it.

I came across some mermaid crowns on Instagram and was a bit blown away by how pretty they were. Then I realised I have a massive bag of seashells that have been sitting in my room waiting for the perfect craft opportunity!

So without further ado, here’s how I made my mermaid crown.

You’ll need:

  • Wire
  • String
  • Pliers
  • Polymer clay
  • Small seashells/ocean-themed embellishments
  • Hot glue gun

Step 1: Measure around your head using a piece of string. You’ll want to place the string where you want your crown to sit so you know exactly how big it needs to be. Make a mark on the string so you know where to cut it.

Step 2: Cut a piece of wire a centimetre longer than your string. You don’t need the string anymore, your wire should now be the right size for your head. The extra centimetre will provide room to bend the ends and join them together to make a circle.

Step 3: Build the frame for your crown. I folded wire pieces around the circle and twisted them with pliers to make spikes. I used my glue gun to hold them in place if they didn’t stand up.

Step 4: Cover the frame in polymer clay. Make sure there is no wire or glue exposed, and try to smooth over any seams in the clay. It doesn’t need to be perfectly neat because it looks good with a more “natural” effect. I twisted long pointed sausages of clay around the spikes to create the spiral effect.

Step 5: Bake it! Follow the instructions provided with your clay. Make sure the wire and glue are completely covered before you put the crown in the oven.

Step 6: Embellish your crown. I chose pretty pink and purple seashells and arranged them carefully on the crown, sticking them down with my glue gun.

Step 7: Head to the beach and show it off!

SAM_8426

SAM_8415

Magical Snow Jar

SAM_8293

I love snow globes. They’re like little fantasy worlds encapsulated in a glass globe which we can escape to simply by turning them upside down to watch the snow fall. I loved the idea of making one myself, and since it’s Christmas, it seemed like a good time to do it!

You’ll need:

  • A waterproof ornament (I made mine myself, so stick around for details at the end if you want to do the same)
  • A jar with a watertight lid
  • Strong, waterproof glue (I used Gorilla Glue)
  • Distilled water
  • Glitter

Step 1: Glue your ornament inside the lid of the jar. Ensure there is enough space left around the edge so that it can still be screwed onto the jar.

Step 2: Fill the jar with distilled water. The water will overflow when you put the ornament in, but by filling the jar as much as possible you can prevent air bubbles.

Step 3: Add glitter to the jar. I tested a few different glitters before I found one that didn’t clump or float. In the end I chose some cosmetic “fairy sparkle” glitter. It was fairly fine and I found that the holographic shades worked best. If you’re not sure how much to add, go for more rather than less.

Step 4: Screw the lid onto the jar. It’s worth putting some waterproof glue around the lid to ensure there are no leakages and the lid cannot accidentally be pulled off.

Step 5: Finish it off with a bow! I used a glittery wired ribbon to give a pretty, festive finish.

SAM_8304

If you’re making your own ornament:

I made my snowman with polymer clay and painted him with acrylic paint. To stop the paint from flaking in the water, I glazed it with a waterproof varnish. The one I used raised slightly in the water and made bubbles, but then went back to normal when the snowman was removed from the water and dried. I decided that because the bubbles were whitish it made the snowman’s hat and scarf look frosty, but I’d recommend using a primer and a good quality glaze for other items. Ensure it is glazed completely with no gaps to prevent water from getting trapped beneath the paint.

If you use coloured polymer clay, it shouldn’t need to be glazed, but I’ve heard from others that the clay can develop a whitish coating over time from being submerged in water. Using distilled water should help to prevent this.

Bats on a Branch Decoration

SAM_8118

Halloween is one of my favourite times of year because you can go a little crazy on decorating and setting an atmosphere. And eat all of the sweets, of course! I was inspired to make these little bats after a walk through the woods where I found lots of creepy-looking branches which I brought home with me. Now to decide what to do with the rest of them…

You’ll need:

  • A spooky branch
  • Clay (I used air-drying clay for this)
  • Acrylic paint
  • A glue gun
  • Elastic (or thread)

Step 1: Roll out your clay and cut out 9 wing shapes. Cutting a stencil out of cardboard first will make this easier. You’ll only need 6, but making extras will reduce frustration from potential breakages during step 2.

Step 2: Once the wings have hardened, roll three small balls of clay to make the bats’ bodies. Flatten them so that they are slightly oval-shaped. Now push the wings into the bodies.

Step 3: Use a clay tool to poke holes for the bats’ eyes. Then leave the bats to harden.

Step 4: Paint your bats. I went with black but you could be creative with your colours. You could also paint the branch if you like. I left mine natural.

Step 5: Cut three lengths of elastic or thread to the same lengths as the distances that you want the bats to hang from the branch, plus a little more to the allow for tying them to the branch. I staggered mine a little. Then tie them on to the branch.

Step 6: Use your glue gun to stick the ends of the elastic to the backs of your bats.

Step 7: Tie a loop of elastic or thread to your branch so that you can hang it. Because the weight of the branch may be uneven, it’s best to tie the ends of the thread wide apart to create a sort of triangle loop, rather than just in the middle.

SAM_8121

Woodland Creature Necklaces

SAM_8122

I have this thing about foxes at the moment, and after seeing some cute little fox necklaces online, I decided to make myself one. Then he looked lonely, so I made him a little deer friend!

You’ll need:

  • Clay (I used air-drying clay because it’s all I had but for something like this I’d recommend oven-bake as it’s much more durable.)
  • Acrylic paints (or you could use coloured clay)
  • Jump rings
  • Jewellery cord
  • Cord clasps

Step 1: Roll a piece of clay into a ball about the size you want the pendant to be. Then carefully mould the ball into the shape of an animal head of your choice. Use an image as a reference point to make this easier.

Step 2: Once you have moulded the shape, push a jump ring into the top. Make sure you close the clay over the top of the metal so it can’t come out. Then bake your pendant or leave it to dry.

Step 3: When your pendant has hardened, paint it using acrylic paints. Use an image to copy the patterns on the animal’s fur. Once this has dried, glaze it using a varnish. You can go straight to the glazing step if you used coloured clay.

Step 4: Measure jewellery cord around your neck and cut it to the desired length. Use pliers to attach a cord clasp fastening to the ends.

Step 5: Using your pliers, connect a second jump ring onto the existing one on your pendant. Close it so that the cord runs through it.

SAM_8123

Wooden Quote Sign

SAM_8113 (2)

This just a little something I decided to play around with one afternoon. I had a spare wooden plaque from a previous project, and I recently purchased some new rubber stamps and ink pads. I’d seen a sign with this quote on before and thought it was super cute, so I decided to have a go at making my own.

You’ll need:

  • Wooden plaque
  • Alphabet rubber stamps
  • Ink pads

Step 1: This project is pretty straightforward, but it’s not the easiest thing to get right (mine took a couple of goes and I’m still not totally happy with it). For this reason I’d recommend drawing around your plaque and practising your positioning on a piece of paper first. I actually totally messed up on the word “messy”, but I got lucky on the word so I could style it out and exaggerate the word.

Step 2: Once you’re happy with your practise sign, stamp your message onto the real thing. I used different colours to make the key words stand out.

Step 3: If you want to add some extra decoration, you can use punctuation stamps creatively. I used my full stop stamp to create a dot pattern around the outside. I also used heart stamps to decorate it further.

Step 4: I stopped at step 3, but to protect your sign you could coat it with a varnish when the ink has dried. Drill a hole in the top to hang it, or simply tack it to the wall instead.

Now you can display your favourite quotes in your home with pride!

Maleficent Headpiece


SAM_8069Hello, hello! Sorry it’s been so long, but after a bit of a hiatus I’m back with lots of new, fresh ideas.

As Halloween is approaching, I’ve started preparing my costume (although we’ll have to wait and see whether I actually wear it or change my mind at the last minute…) and one of the most awesome, “scary” characters ever is Disney’s sassy villain, Maleficent. Here’s how to make yourself a headpiece like hers.

You’ll need:

  • Card
  • Tape
  • PVA glue
  • Plaster bandages (optional)
  • Newspaper
  • Paint
  • Elastic

Step 1: Blow up a balloon to about the size of your head and sit it in a bowl. You may need to secure it with tape. Then tear up newspaper pieces, dip them in a mixture of PVA glue and water and stick them to your balloon. Cover it until you’ve got the shape you want your headpiece to be, then stick a couple more layers over the top to thicken it.

OR cover your head and hair with a protective cap (I simply used cling film) and then dip pieces of plaster bandage in water and smooth them over your head to create the shape of the headpiece. Make sure you don’t cover the back of your head because you need to be able to get the headpiece on and off. You can papier-mâché over the plaster to even out the shape afterwards.

Step 2: Make cones in varying sizes using your card, then tape them together in a sort of spiral to make the shape of the horns. Try to make them symmetrical.

Step 3: When the headpiece is dry, tape the horns to it and cover these using the same papier-mâché method as before. Give them a few layers to make sure they’re strong and secure.

Step 4: Once everything is dry, paint your headpiece. I used acrylic paint to do this.

Step 5: To keep the headpiece on your head securely, make a hole in each side and thread some elastic through. My headpiece has three strands of elastic running across the back to ensure it is held securely in place.

Now find yourself a staff and a pet raven and live your life as a glamorous and powerful villain! (Or you could use your powers for good!)

SAM_8110 (2)

Disney Quote Necklaces

Ariel: "Part of your world"

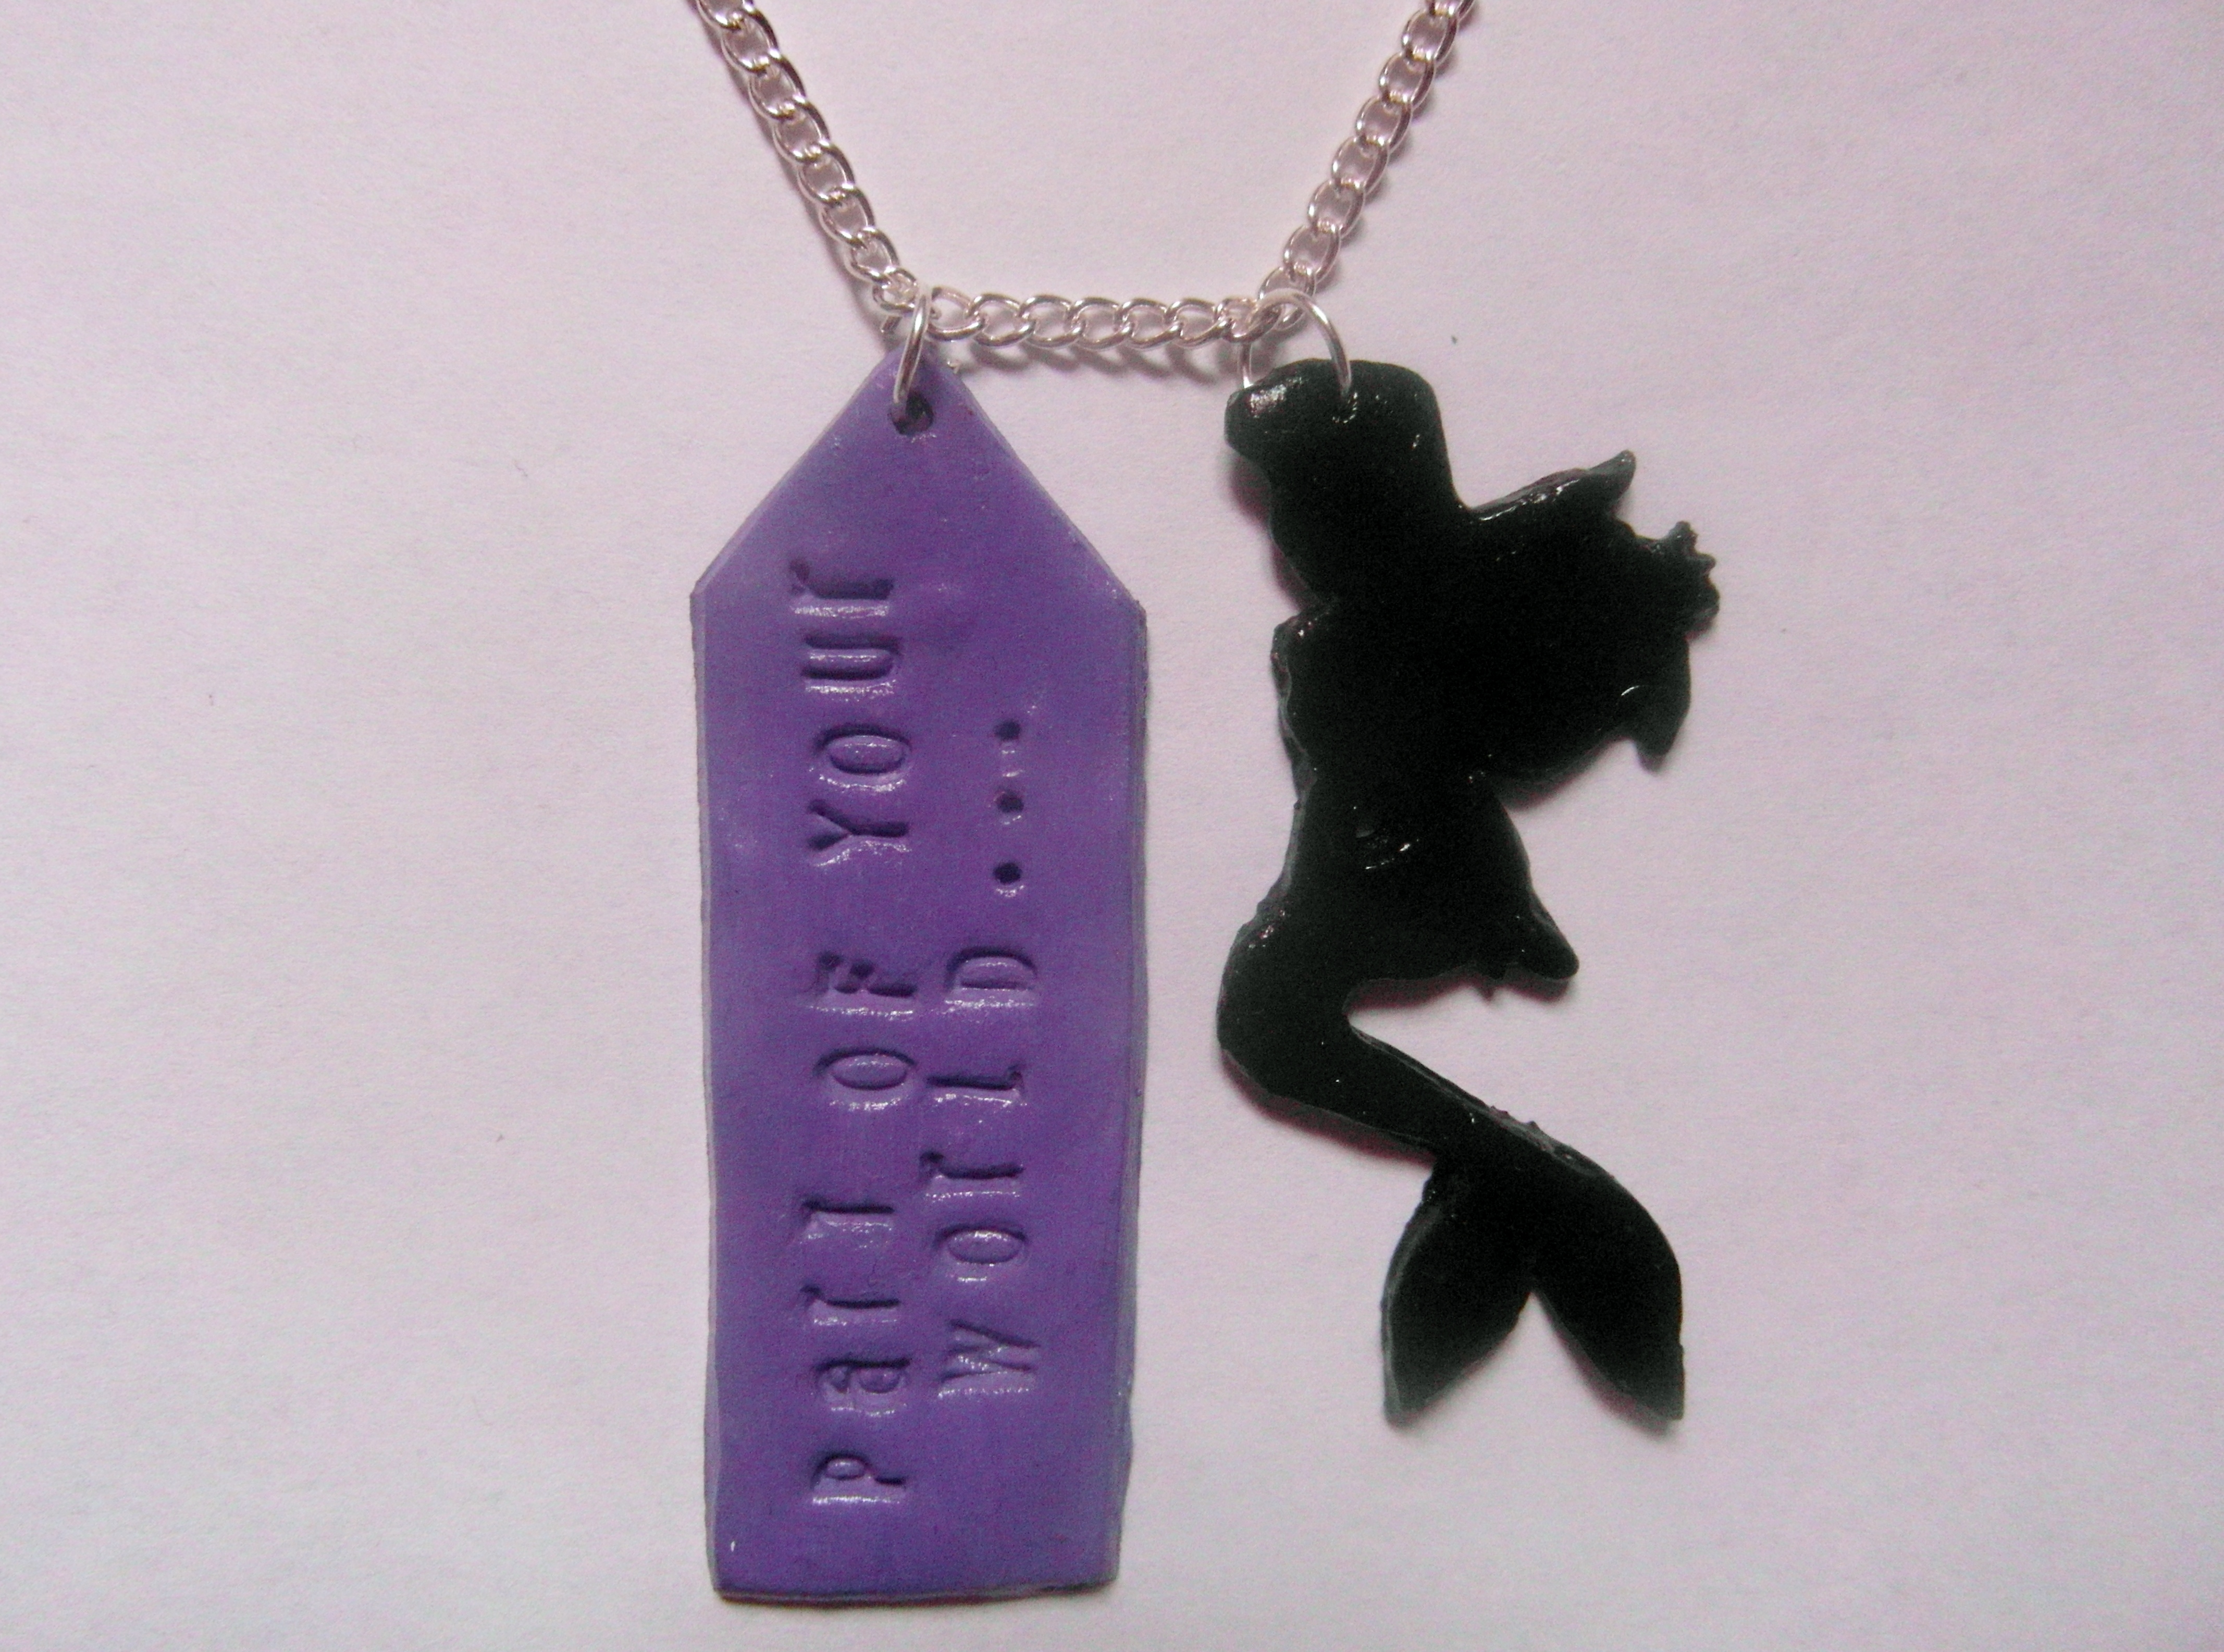
Ariel: “Part of your world”

Disney characters are some of the most recognisable characters ever invented. This made them perfect for this experiment. That and the fact that I love Disney! These silhouette necklaces feature tags with hand-stamped quotes from the characters.

You’ll need:

  • Oven-bake clay
  • Rolling pin
  • Clay tools
  • Pencil and paper
  • Scissors
  • Image reference (I used images found on Google)
  • Alphabet rubber stamps
  • Acrylic paints
  • Jump rings
  • Jewellery chain
  • Clasp

Step 1: First, find an image to copy. I searched specifically for silhouette images so that I knew they would work well. Then either sketch out the image or print it to the size you want, and cut it out.

Step 2: Roll out your clay to a thickness of about half a centimetre. Lay the image on top of it and use your clay tools to cut around it.

Step 3: Use a pointed clay tool to make a hole in the top of your silhouette. You’ll put a jump ring through this later. You may also need to neaten up the edges.

Step 4: Roll out some more clay and stamp your quote onto it. It can be tricky to get the positioning right, and by stamping the letters before you cut out the tag you can get a better idea of how much space you need. Take into account how big you want the tag to be so you know when to start new lines. Try to keep the quote short, depending on the size of your letters.

Step 5: Cut out a tag shape around the quote. Make a hole near the point.

Step 6: Bake the two parts according to the instructions for your clay.

Step 7: Paint the pieces with acrylic paint. I went with black for the silhouette, and chose a colour relevant to the character for the quote tag.

Step 8 (optional): When this is dry, use a varnish or sealer over the top to give extra protection.

Step 9: Put jump rings through the holes you made in the clay. You may need pliers to help you open them. Don’t close them yet.

Step 10: Position the clay pieces where you want them on the chain, then connect it to the jump rings and close them.

Step 11: Connect the ends of the chain with a clasp (or just a jump ring if the chain is long enough to put on and take off without undoing it).

Now you can always be inspired by your favourite Disney characters! I think these would also work well as keyrings. Here are some more that I made.

Maleficent: "What an awkward situation..."

Maleficent: “What an awkward situation…”

Peter Pan mermaid: "We were only trying to drown her..."

Peter Pan mermaid: “We were only trying to drown her…”

Simba: "I laugh in the face of danger"

Simba: “I laugh in the face of danger”

Peter Pan: "Think of a wonderful thought"

Peter Pan: “Think of a wonderful thought”

Unicorn horn bracelet

SAM_8008

This one’s for all you unicorn lovers out there! This unicorn horn bracelet features a personalised tag and glows in the dark.

You’ll need:

  • Clay (I used air-drying clay but I would recommend oven-bake)
  • Jewellery chain
  • Jump rings
  • Jewellery clasp
  • Pliers
  • Acrylic paint
  • Waterproof sealer (if using air-drying clay)

Step 1: To make a horn, roll two equal-sized thin sausages of clay, squashing them down towards one end to create cone shapes. Then squash the fatter ends together and twist them around each other until the points meet. Repeat this step until you have as many as you need. I would recommend making extras in case of breakages, especially when using air-dry clay.

Step 2: Now you need to attach jump rings. Push them into the flat ends of the horns, and close the clay around them to keep them secure.

Step 3: Make any additional features. I sculpted a little heart which I attached a jump ring to, then I rolled out a small piece of clay and cut out a gift tag shape to make my personalised tag. I used alphabet rubber stamps to imprint my initials on the tag, but you could carve these in yourself. I also used a clay tool to make a hole in the top.

Step 3: Let the clay pieces dry or bake them. If you’re baking them, check that it’s safe to do so with jump rings attached first. Otherwise, you can simply pinch the clay and make a hole through it to put the jump ring through later.

Step 4: Paint your pieces using acrylic paint. I chose silver for the horns and pink for the heart and tag. On one side of the heart, I used glow-in-the-dark acrylic.

Step 5: Coat your pieces with sealer to protect them. This is important if you’re using air-dry clay as this will not be waterproof unless sealed.

Step 6: Break off the right amount of chain to fit your wrist comfortably. Remember that it will be slightly longer when you add the clasp.

Step 7: Attach a jump ring to each end of the chain, and connect the clasp. You may need pliers to open and close the rings.

Step 8: Use more jump rings to connect your clay pieces to the chain.

SAM_8013

SAM_8009

Pink and Gold Party

It’s finally happened! I’ve finally turned 21! Which means I finally got to show off the party decorations I’ve been working on for so long! Here’s how it all looked in the end…

The Sweet Buffet

SAM_8176 SAM_8180 SAM_8181 SAM_8182

I decorated jars with ribbons, glitter and pretty things and filled them with pink and gold (or yellow or orange) sweets. I also made a photo frame-style sign for the table. My origami flower lanterns made an appearance here, but I forgot to turn them on! Disaster!

The Tables

SAM_8189SAM_8200

The tables were scattered with origami paper flowers and stars, pink birthday confetti, pink and gold overlapping tablecloths and my glowing pom-pom jars. My mum wrapped spray bottles in pink tissue paper to make weights for the balloons.

The Photobooth

SAM_8196

I connected my magnetic mini tripod to a microphone stand we had in the shed to create a full-sized tripod. I taped together streamers to create the gold curtain, and filled a box with props to use.

The Food

SAM_8192SAM_8193SAM_8213

Of course the food also had a pink and gold theme. My favourite dessert was the pink cheesecake, which was actually chocolate flavoured with pink angle delight on top.  The cake pops were a disaster, don’t look at them.

I made a bouquet from leftover origami flowers and stars to stick on top. I also used photo frame scrapbook decorations to label the food. I painted them gold, edged them in pink glitter glue, stuck paper to the back to write on, then taped cocktail sticks to the back to stick them in the food.

The Room

SAM_8183SAM_8190

I decorated the walls with pom-pom garlands, my toilet roll flowers, and of course fairy lights. And a dance floor full of balloons? Yes please!